Sunday, May 12, 2013

Tin Sachet Tutorial

It's Been Awhile..

Hey everyone! I know it's been awhile since I've posted anything, life has been pretty busy. Although, it has also been very crafty :). I'm here today to share a tutorial on how to make a fancy tin sachet.


What would you use it for?

     Well, I found them especially useful to store in clothing drawers, linen closets, suitcases or purses, basically anywhere you want to smell good. All it is made from is a tin (Altoids, tea tins, etc.,) spray paint, your choice of scent transportation(potpourri,scented wax,dryer sheets, soaps, etc.) and a bit of elbow grease. This could even be made in a bigger scale, like a cookie tin, and put into rooms to offer a nice fragrance in the air. Can anyone say great gift idea too? It's only about a day project to make one this size, and I honestly could get out of control with making too many! I'm sure these will be seen a lot throughout the blog, just in different forms. The options for designing these are endless, but today I am going to show you one of the ways it can be done. So, without further adieu...


Let's Get Craftin'

Step One

So, our first step is to find a tin with which to work with. I happened to have in my cabinet a celestial seasons tin that came with a box of tea I purchased. In order to spray paint the tin, you need something for the paint to grip on to. I sanded the entire outside of the tin using 120 grit sandpaper. If it was not sanded, the spray paint would peel off easily.


Step Two

I wanted to add a bit of a design on top of the tin, so I decided to make a stencil. I cut a piece of paper the size of the top of the tin and penciled a design on it.

Step Three

I used a utility knife to cut the design out of the paper.

Step Four

Place the newly-made stencil onto the tin and trace the design onto the tin using a pencil.

Step Five

Take the stencil off and using your pencil mark where you want your holes to be. The holes lets the scent leak through, so more holes means a stronger smell. So if this was being put into a small area like a drawer, purse, or suitcase I wouldn't put too many holes into it, unless you want the scent very powerful. Many holes would be good for larger spaces like closets, bathrooms, etc.


 Step Six

Now this is where it gets a bit tricky...I used a hammer and a small nail to punch the holes through the tin. In order to do this, you must have something hard behind the area you are going to punch holes through, but it also needs to have some give so the nail can penetrate the tin. Their are a bunch of ways to do this such as a block of wood, a sandbag, or what I used, a chunk of a phone book covered in electrical tape(I'm inpatient..:).)
To use what I did, all you have to do is cut a chunk of phone book out, a hack saw was used to do this(thank the love of my life.) And please, try to make it so it can fit inside the tin. I though my chunk would until it was taped up, and no longer fit. It will just make your life easier if it fits, as you will see how I had to balance the chunk in order for the tin to come in contact with it was rather difficult. >.<


And then covered in electrical tape

Step Seven

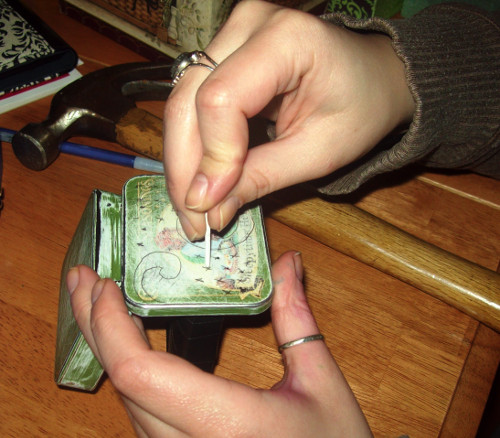
 Using your little block, position it under the lid and get your nail ready. Hammer into the tin until you have a hole. Continue to do this until you have all the holes you want. I wanted nice clean holes, so I hammered until the nail went into the phone book.
Here is the finished result.


Step Eight

 Unfortunately, I did not think of taking photos during this stage(sometimes getting lost in the creative process is a big BOO,) but I will explain as best I can what to do next. The next step is to paint your tin. I spray painted the entire tin a flat black and let dry for about six hours. The paint needs to be 100% dry before you try to lay your stencil down, or you will peel up paint. I used my DIY modge podge to adhere the stencil down and then used electrical tape to cover the sides of the tin. Then a gold spray paint was laid down.

Once the gold was dry I peeled the tape off and soaked the stencil off using water and a sponge. I then applied a gloss topcoat to seal it all in.

You're Finished!


Fill and place it where you want it to go! I also have a heart-shaped Altoids tin that I'm going to turn into one of these, so keep on the lookout.

It's Time to Part

As I always say, their are many projects underway, and their is always something for me to rant and rave about. I also recently made a deviantart account, located here, which showcases all of my finished project photos, drawings, and every other artsy-fartsy thing I do. I hope you enjoyed another installment of the Neophytes Guide to Crafting, I'll see ya soon!

Crafts and Kisses,

Monday, April 29, 2013

Cardboard Wreath DIY Tutorial

And we're back!

I wanted to give everyone some time to soak up the last post before I began talking about the next project to be posted.

This week I will be giving a quick tutorial on how to make a wreath from cardboard tubes.

Cardboard tubes?

     I was originally inspired to do this while surfing Pinterest. I'm going to note now that I am an absolute Pinterest whore, and much of my inspirations come from there. I noticed that their are countless uses for the cardboard tubes that we acquire from toilet paper, paper towels, shipping, etc. I liked the idea of making a wreath since wreaths hold a special place in my crafty heart and it seemed like a good starter project to get into the cardboard tube world.

     Since I have a lot of butts available to me, it only took me about a week to get the amount of tubes I thought I would need.  Paper towel tubes were cut down to the same length as toilet paper tubes just to keep some uniformity. I also even altered a K-cup box to house my tubes, they fit perfectly and when full will have the correct amount of tubes to make a wreath the size I did. Not to mention that it is just neater than having tubes all over your house or in plastic bags everywhere.
I'm sure the K-cup boxes have an endless amount of organizing capabilities also.
 But this is a conversation for another time, let's move on and begin the tutorial.

Tutorial Time!

Okay, so this tutorial is not meant to be done exactly as I have shown it. Their are endless possibilities for the layout of said wreath and a bunch of different ways it can be decorated. I am just offering up my advice on how I did it, what issues I had along the way, and the end result.

Step One


The first thing you are going to want to do after you have the amount of tubes you will need (about 15-20) is to cut them. All of the paper towel tubes I had were cut down into the length of a regular toilet paper tube. After this step was done I cut the tubes themselves into three to four pieces each tube. All you do is flatten out the tube and cut right through. I varied my cuts, meaning not every piece cut was the same width. I would get three pieces from a tube and sometimes four or five. I wanted to vary the height as to add a nice 3-D effect once it was all assembled.

Step Two

I was under the assumption it was a good idea to make a template for the wreath, since I planned on spray painting the tubes two different colors. Making the template this early was a bad idea, you'll find out why later on, if you haven't realized it already. So, I laid out a big piece of white paper, and laid my cut out tubes into the wreath shape that I wanted.

 Using one of my alcohol dyes, I sprayed all over the paper and tubes. This was the result after the tubes were taken off the paper.

As you can see, it did do a good job at making on outline, I also outlined the entire thing with a pen to make it more noticeable.

Step Three

Coloring the tubes can be done a number of ways. I have seen people paint them with acrylics, spray paint them once they are all glued together, and I imagine that even using washi tape and gluing paper to them could also work, depending on the effect you wanted. I wanted two separate colors, even though attaching the whole wreath together and spraying it all one color was a better choice for a beginner like me, I needed those two colors. 

One of the problems I noticed while trying to spray paint these tubes is that they are very light. The air that comes out of a spray can blows these babies away. This can be solved by attaching them to a sticky surface(double sided tape anyone?) or simply using a light hold glue to keep them in place.  I unfortunately did not think this far ahead and wanted it done ASAP, so I carefully picked up every single tube cutting  with a pinching-type tool(pliers, tweezers, whatever you can find) and spray painted them individually. Needless to say it was very time consuming and messy on my end. I painted them gold and lavender.

Here are the freshly painted tubes drying.

I let them dry overnight before attaching them together.

Step Four

Now that the tubes are dry, we can begin to attach them to each other to form the wreath. I whipped out the template, plugged my glue gun in and began. First issue with making the template was that I was not putting the EXACT same pieces in the EXACT spots for them, so my template became more of a guideline after the pieces stopped fitting and matching together.
As you can see in the end the template had no real use. My advice if you're doing this for the first time would be to just glue the wreath together and spray paint while it's one whole piece. If it was done that way the template would be useful because you wouldn't be removing the tubes and trying to puzzle them back together like I had to. I think the wreath would look cool without paint, especially if your cardboard tubes are different shades of brown and white.

Step Five

It is now time to decorate the wreath. You can choose to leave it bare, but I wanted to go a bit fancy with mine and incorporate a previous DIY tutorial on here, the birdhouse. I made a birdhouse just for this wreath. I also went to my local Michaels craft store and picked up some fake flowers.


I glued all of the flowers and birdhouse on with a hot glue gun. This was about half-way through the decorating process. I also managed to find some little decorative birds at The Dollar Tree. This is the end result.

 I feel like the widdle birdie makes it.

What's next?

I have quite a few projects underway right now made with materials that are quite inexpensive to acquire. Some of these projects include paper plates and plastic Easter eggs. I am also going to post a tutorial of how to make home made body wash using bar soap(the correct way!) See you soon!


Crafts and kisses,


Friday, April 19, 2013

DIY Modge Podge and Alcohol Dyes

Good Day Everyone!

I wanted to stop by and share some quick tips before moving onto any other projects. I mentioned in a previous post how I was going to do a quick tutorial on how to make your own Modge Podge. I also mentioned that I was going to show how to make the alcohol dyes that I used in the birdhouse tutorial. I have many projects in full swing that I'm itching to get out here, so let's get started!

DIY Modge Podge

The DIY Modge Podge is pretty simple. Although it is not recommended for any long-term projects it is still very useful in a pinch. Personally, I've never laid my hands on actual Modge Podge yet and have only been using this since I began my crafting adventures. I haven't had any issues so far with it deteriorating or any of my projects coming apart.

I was going to do a photo tutorial for this, but it is pretty self explanatory. All you need is a jar or container, water, and Elmer's white school glue. The ratio is 1:1, which basically means equal parts of both glue and water. So if the container is filled half way with glue, add water to fill the rest. I like to add the glue in first, because when the water is added it sits on top of it, and this makes it easier to measure out the correct amount. Close the container, shake, and voila! I have my DIY Modge Podge in a mason jar.


I like to shake the container before I use, even though I do not think it is necessary as it doesn't seem to settle or separate. This will yield a matte finish, as I have not found or experimented with making glossy Modge Podge. Glossy Modge Podge may be a future adventure. To save yourself time and aggravation, ALWAYS make sure the lip and lid of the container is clean before you close it. I have already had one instance where the container was glued shut as a result of laziness.

Alcohol Spray Dyes

Up until a few weeks ago, I had no idea that these even existed. Since finding out about them, I cannot seem to get away from wanting to play. :) There are countless uses for these things, and are so easy to make their is no reason why any cratfer shouldn't have these available to them at all times. I used one of my blue alcohol spray dyes in the birdhouse tutorial for adding the lace texture on the base on the house. Thus far, I have only used these on paper, but I would like to experiment with other mediums to use them on.

Alcohol Sprays Dyes DIY

So, you can choose whatever spray bottle you would like to store your dye in. I have heard that the finer the mist, the better, but I guess it depends on how they will be used. I do know that Oriental Trading company(this website is going to be mentioned A LOT on here) sells small spray bottles here.  Six bottles for $5.25 is a great deal. I, on the other hand, got my spray bottles from Sally Beauty Supply, another store that I frequent quite often (I'm a beauty junkie.) Although I paid $2.09 for a pack of two and purchased three, it was still cheaper than paying shipping to Oriental Trading company to just get bottles. I figure they are about the same size. Another difference is the bottles I purchased are not all clear, but a mix of blue, pink, green, and clear.

The next item you will need is the dye. I have read of several different dye products that can be used such as Rit (powdered and liquid), food coloring, powdered juice mix (such as Kool-aid), and gelatos. I have only experimented with food coloring, since I happened to have it on hand.

After that it is just toothpicks and rubbing alcohol. I used 50% that I purchased from Dollar General, it was pretty inexpensive and did what I needed it to do, no complaints.

So, all you have to do is fill the spray bottle with the alcohol. We are going to be refilling my pink.
    
Grab your food coloring. I'm using Wilton gel food coloring in Red. These can be purchased at Walmart, in a pretty big selection of colors for cheap money (I paid around 1.50, colors vary in price.)
Grab your tooth pick and dip into the jar to grab some dye. A little goes a long way with this stuff, so start off with a small amount and work up to your desired intensity. Since I am making pink, I'm only going to use a very small amount. I apologize for the blurry photo, but you can see that the toothpick is barely coated in the gel.
Drop the toothpick into the bottle, put the cap on, and shake it up.
That's it!

I've made six colors so far, labeled the bottles, and used a block of florists foam (got a four-pack from The Dollar Tree) to make a stand. All you have to do is push the bottles into the foam. I also made another hole using one of the bottles to store some toothpicks.

I've heard that the bottles from Oriental Trading do have a tendency to leak if they are not stored upright, so I highly recommend this be done if those bottles are being used. The ones that I purchased from Sally Beauty Supply were stored on their sides for quite some time and didn't leak, but I still didn't trust them. I also have a blue dye that I stored in a Dove body spray bottle and it sprays a very fine mist, not too mention holds quite a bit of product.

Let's Wrap it up

I hope that you have found these recipes helpful. If anyone has any comments or questions do not hesitate to chime in. Their are quite a few projects underway that I will be posting in the next few days, it has been pretty busy and I'm trying to catch up with everything. I'll be back!

Crafts and kisses,


Monday, April 8, 2013

Birdhouse Tutorial

It's Finally Here!

After a week of fighting with photos (it has been a long time since I have done a photo tutorial,) I have managed to get the tutorial for the birdhouses up.

I would like to note a few things before we begin. One being that if these gift boxes are not accessible to you but you still want to make the birdhouses, I have found two birdhouse printable templates online. Although they are not the same as the gift-boxes, they could be altered or simply used as is.

Paper Primrose Birdhouse Template
Barefoot Stamper Birdhouse Template

If none of these are appealing, simply do a search for "Birdhouse paper template", it should come up with a bunch. They can be made using any material you are capable of working with.

Secondly, I am still learning, and I do realize that their are better ways to do some of the tasks that have been covered in the tutorial. All I can say is, if you know of them, don't hesitate to share.

The birdhouses we will be making will be a part of a bigger project that is underway, so keep on the lookout for updates.

Okay, that's enough blabbering for now. Let's get started.


Begin

So, if you were lucky enough to find these boxes or something similar, the first thing we must do is cut them in half. I used a simple utility knife to do the job. Don't have to cut it if you do not want to, but I wasn't making it to be a 3-D model, just something I can easily hang on a nail or attach to other items.

Cover the base. I used a thin, white card stock for this. Using glue (home-made modge podge) I painted a thin layer onto the box and got my first side down. I left some over hang and cut it in the corners so these can be folded down onto the bottom of the box. This way, no edges are visible on the bottom and they are less likely to peel away.
 After all of the edges have been folded down, I added another piece of card stock to cover the exposed area on the bottom. Paint another layer of glue over the entire box to seal the edges.
 I did the same to the roof using a different card stock. The card stock for the roof was more difficult to cut, and have included pictures to show where the cuts were made in order to cover the roof with as little pieces as possible.


Now, if you used card-stock that you like, you can proceed to gluing the two pieces together. I however wanted to do an effect, which is why the base of the house is white. This is what I did to get the lace pattern.
I wrapped the box in lace that I purchased from Jo-Ann fabrics a long ago(I love lace). Using a homemade alcohol dye I sprayed the entire box. I will make a post at a later date on detailed instructions on how to make them, but the spray is just alcohol and food coloring, pretty easy to figure out.
This is the result.
 Now we can glue. I recommend using a glue gun to do this, but at the time didn't think of it, so I just used an all-purpose craft glue. Make a thinline at the top of the base and slide the roof on where you want it to sit.

If you used one of the templates, a hole has already been drawn, go ahead and cut it out. I had to sketch mine on using a pencil and then cut it out with my utility knife.

I cut about two inches of twine that I bought from Dollar General. The length should be greater than the diameter of the circle that you have cut. Separate the twist until you end up with strands.
Take it and line it all up. Cutting off any long ends.
Flip the birdhouse, put some glue down, and place at the bottom of the hole we just made.
Cut out a square from black cardstock big enough to cover the hole. Place more glue around the hole and set the black square.
 This is the result. More of a 3-D effect.

Next we are going to make the perch. I managed to find a good branch outside to do this with, but this can be made out of multiple items using different techniques. Cut the material the length you want the perch to be plus another half inch.
Cut a cross underneath the hole where you will want your perch to be. I used a utility knife to do so.
Push the perch into the cross and glue it in the back to secure.
So that is the basic birdhouse. I wanted to embellish mine a bit more so I wrapped some twine around the bottom. Using a line of glue for each wind around.


 I also cut the twine in the back and glued the edges down to secure it.

And that's pretty much it! I added another embellishment ( the pink rose at the peak of the birdhouse) and voila, birdhouse.
A couple of variations using different card stocks and embellishments:


Whew, that was a lot.

They are pretty easy to do once you get the hang of it. I will be making another one to be used in a bigger project, which I hope on releasing sometime next week. Spring is around the corner and these would be fun to make with kids, or to decorate the house. Depending on the material they are made out of, they can also be used as a decoration outside and in the garden.

Time to wrap it up!

I will try to do another post before the big project that I'm doing is posted, maybe covering some of the things mentioned in this tutorial (alcohol inks, homemade modge podge, etc.) If their are any questions or comments please do not hesitate to comment or contact me. I hope you enjoyed the first tutorial here on The Neophytes Guide to Crafting and I hope to see you soon!


Crafts and kisses,